Impressive Color Blending Technique

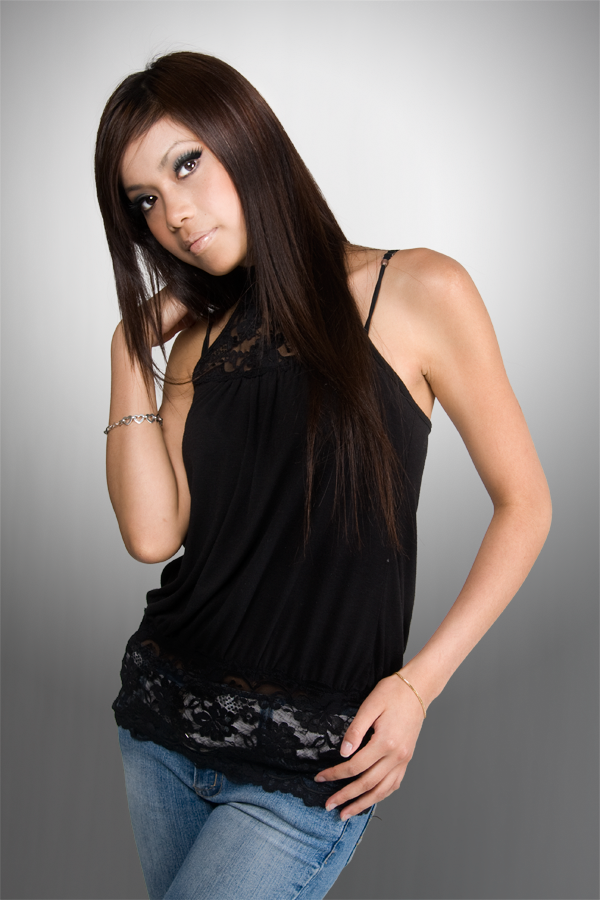
The first, you open the photo below:


Go to Filter > Sharpen > Sharpen to sharpen it.

Then go to Images > Adjustment > Level (or press Ctrl + L) and set options like this:


Duplicate layer and set blend mode to screen, opacity 39%. Go to Images > Adjustments > Color Balance, set options:

S: -62.+20.+47
M: +33.-17.+6
H: -9.+5.+27

Your result:


Create new layer, fill it with #faf2ca and change blend mode to screen, opacity 31%.

Continue to create a new layer, fill it with #bebebe. Blend mode color burn, opacity 31%.

You'll get this:


Press Ctrl + Shift + Alt + E to create a new layer like the previous result . Set blend mode screen and opacity 38%.

Go to Images > Adjustment > Color Balance, set option:


You've get this:


Create a new layer and fill it with #0d004c, set blend mode to exclusion, opacity 54%.

Press Ctrl + Shift + Alt + E again to have the layer with result that you've done before. Set its blend mode to soft light, opacity 50%.


Choose burn tool and set options like this:


Make some lighten areas to be darker (like cheek, hand, hair, etc.). I think you should fix her eyes too.


Ok, now duplicate the background image and put it on top, press Ctrl + Shift + U to make it be black & white. Set blend mode to soft light, opacity 47%.

Now you've got this:


The layers window at this time:


Add some brushes and text into your work to make it looks better.


Make Up Effect for the Face

Make Up Effect for the Face

Make Up Effect for the Face

In this Photoshop tutorial I will be walking you through the creating new make up for the face.

Open up the stock photo you’ve chosen to be working with for this tutorial. First of all we need to make face skin softer. For this effect duplicate layer with Ctrl+D and apply Filter > Blur > Gaussian Blur with the next presets:

Make Up Effect Image 01

After that mess with the layer mode & opacity/fill. I tried Soft Light with opacity of 60%. Ok, now get out the Eraser Tool and make clear area out of face skin.

Make Up Effect Image 02

Merge two layers in one. See the difference:

Make Up Effect Image 03

After that I think we should add some lipstick on lips. So, select the Polygonal Lasso Tool and make selection as on picture below:

Make Up Effect Image 04

Press Ctrl+J to duplicate selected area and change the color with Image > Adjustments > Hue/Saturation using similar settings to these:

Make Up Effect Image 05

Now we have something like this:

Make Up Effect Image 06

To bring it real view find and get out the Eraser Tool and clear unnecessary parts of the layer out of lips. After that set opacity up to 70% for this layer.

Make Up Effect Image 07

Now I would like to change eyes color and add some eye shadows. Select the Elliptical Marquee Tool and make selection as below:

Make Up Effect Image 08

Press Ctrl+J to duplicate selected area on the new layer. Now Image > Adjustments > Levels with the next presets:

Make Up Effect Image 09

To get the next picture:

Make Up Effect Image 10

Ok, now select the Eraser Tool again and a soft round brush to make a little clean work as on picture below:

Make Up Effect Image 11

After that create a new layer, then select the Polygonal Lasso Tool and make selection similar to the picture below:

Make Up Effect Image 12

Fill the selection with color of #a2ab8d and press Ctrl+D to deselect chosen area:

Make Up Effect Image 13

Apply Filter > Blur > Gaussian Blur with the next presets:

Make Up Effect Image 14

Make Up Effect Image 15

Change layer mode to Hue:

Make Up Effect Image 16

Looking pretty good! Isn’t it? And the last one thing, I would like to put on rouge. For this create a new layer, then get out the Brush Tool and a soft round brush and make not so big spots from the left and rights sides of the face using color of #ff94a8:

Make Up Effect Image 17

Now apply Filter > Blur > Gaussian Blur with similar settings to these:

Make Up Effect Image 18

Your picture should look as mine:

Make Up Effect Image 19

Now clear rouge out of face borders using the Eraser Tool and set up layer mode to Color for the layer:

Make Up Effect Image 20

That is it! Now we have cool make up effect for the face.

Make Up Effect Image 21

Design a Stylish Fashion Advert

In this Photoshop tutorial we’ll be designing a simple but stylish fashion-themed advert. You know, so you can sell sunglasses and stuff ;)

Stylish Fashion Advert Photoshop Tutorial

1. Document Creation

Get started by finding a nice, suitable stock photo to work with. For this you’ll want to use one of the following websites:

I used a stock photo that I bought/downloaded for free (can’t remember exactly) from iStockPhoto a while ago.

Stock Photo Chosen

As you can see, I’ve chosen a photo of a pretty girl wearing big sunglasses (now the theme of the design). Open your photo in Photoshop and get to work by resizing it, copying it to a new document, or whatever you want to do with it.

2. Colourise

Create a new layer (layer > new > layer) then get out the Gradient Tool. Using the gradient tool, add a very bright radial gradient onto your new layer (like this):

Bright Radial Gradient Added

Try a few different layer modes and see which one looks best to you (I chose Screen):

Layer Mode Changed to Screen

You might also want to try a few different Solid Color fill layers, then mess with the settings for those, but this will be fine for now.

Please note that the colors that I used in the radial gradient were roughly #f743fb and #6909d1.

3. Shapes / Details

For this part of the tutorial you might want to hide the layer we previously made (the gradient layer). Start by getting out the Custom Shape Tool and finding the heart shape (or any other shape you think would look cool). Create a new layer and make a few white hearts on your canvas.

White Heart Shapes Added

As you can see in the above image, I also rotated a few of my heart shapes to make it look a little more interesting! Finish off with the hearts by adding a larger, pink-filled one in the background (behind your white shapes).

Larger Shape Added

I finished up by lowering the opacity for the larger heart shape layer, and erasing a few of the edges from the smaller heart shapes (see in the below image):

Heart Shapes Adjusted

Take note that this isn’t an exact science! Get creative here.

4. Halftone Effect

Now we want to add something really interesting on top of our hearts/shapes. Start by opening the Channels tab (window > channels) and creating a new channel (create a new channel by clicking the icon at the bottom of the palette). You might need/want to make a new layer before doing this channel business.

Add New Channel in Channels Palette

After you’ve made yourself a new channel, get out the brush tool, and using a large, soft brush, dob a few times onto your black canvas (making sure your new channel is selected).

Add Brushing to Custom Channel

Now to make an interesting effect out of these boring dobs — go to Filter > Pixelate > Color Halftone and use an appropriate setting (you’ll have to press OK and check if it’s good enough). Using 32 as your Max. Radius should be good enough.

Pixelate Color Halftone Filter Added

Now, holding ctrl down on your keyboard, click on the thumbnail for your new channel, this will select the pixels. Go back to your layers palette and select a new/blank layer. Fill your newly-made selection in the fresh layer with the very bright & colorful gradient that comes with Photoshop.

Colorful Gradient Added to Halftone Selection

To finish off with the halftone effect, you might want to erase the shape away a little bit, in case it’s hiding a bit of the face. Or you could go back to the channel and redo it so it’s a little more to your liking. Unhide your previously-hidden gradient layer and see how it’s looking now!

Unhide Screen Gradient Layer

5. Image Adjustments

It would probably have made more sense to do the image adjustments at the start of the tutorial, but now we know what our outcome is mostly going to look like, we can make some photo adjustments to our stock. The main thing I did was add a levels adjustment layer below our screen gradient layer (note: layer > new adjustment layer > levels).

Levels Adjustment Layer

You may also want to adjust the photo in a few other ways, for example, you could make her lips sparkle a little more? I don’t know! ;)

5. Add Text

This design wouldn’t be complete without some sort of text now, would it? Start by getting out the Horizontal Type Tool (just the regular text tool!) and write out some text, in this case I used two sets of text, one reading YOUR 2ND PAIR and the second set of text reading 50% OFF.

Decker Font Used for Text

The beautiful font which I’ve used above is called Decker, and you can download it completely for free at Urban Fonts. For all of the text I used Decker Regular, except for the word OFF, which I used Decker Bold on. After you’re all done with the text settings, position it accordingly.

Text Positioned Lower Right

I’m not actually sure where would be the best place for this text. If you find your text doesn’t fit, you could always make it smaller and add a Drop Shadow to make it stand out a little more.

Additional Effects

Basically now you should get creative and throw whatever you’ve got onto the canvas, such as patterns, maybe textures, other stock photos, something to go with the theme you’re working with. One thing that I thought was a good idea was to add a scan line pattern into the corner and make it blend in nicely using the layer modes.

Just remember though, you can download the complete PSD file from this tutorial, so if there was something you need help with or want to check out, please feel free to download the PSD file. Another thing to do after you’re all done is change the colors used in your Screen gradient layer, you might come up with a surprisingly nice result!

Stylish Fashion Advert Photoshop Tutorial

Mission Accomplished

Well, we’re done for the tutorial! I hope you enjoyed it, even just a little bit. Now you’re equipped with the knowledge of designing a nice, fashion-themed advert, and the possibility of selling sunglasses will haunt you for the rest of your days :)

Retouching a Studio Portrait

This Photoshop tutorial is written for experienced Photoshop users and will show you unique techniques for retouching photos. You’ll learn how to enhance backgrounds, dodge and burn, brighten eyes, and add hair shine while keeping a low count of layers. The techniques you learn from this tutorial can be used for other portrait photos.

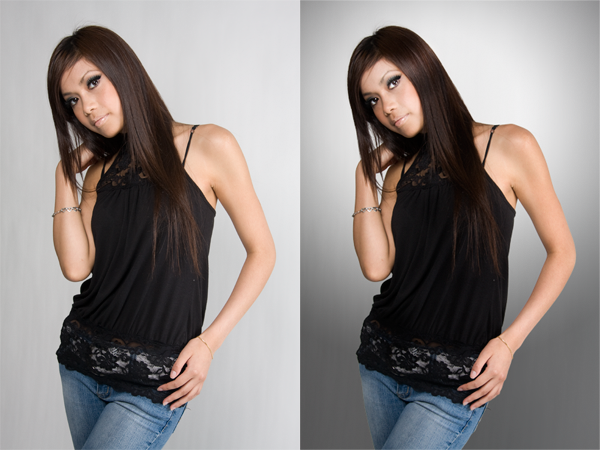
Before and After

image

Retouching a Studio Portrait Photoshop Tutorial

Retouching the background

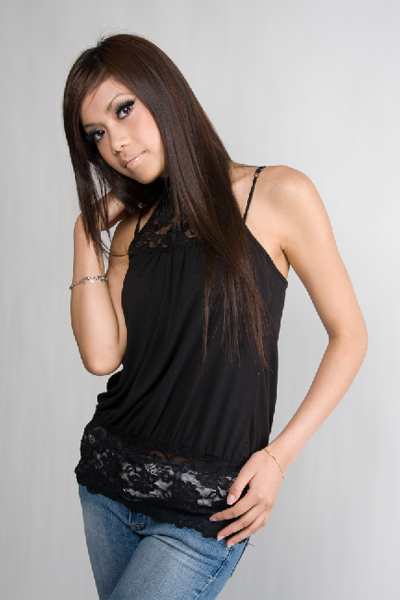
Here is the original image. As a photo it looks fine but it looks flat and boring. This Photoshop tutorial will show you techniques used to make the photo have a stronger impact. You can follow this tutorial with one of your own image or you can use the image below:

image

Creating the mask

The first step is to isolate the model from the background. I used the extract and color range tool to create this. First I used the extract tool (Filter > Extract) but it didn’t work very well for the hair.

image

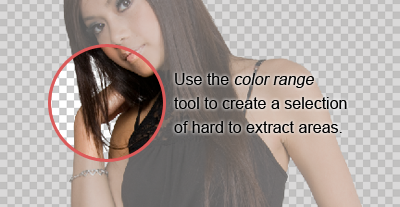
I then use the color range tool (Select > Color Range) to select the areas that were hard to extract using the extract tool.

image

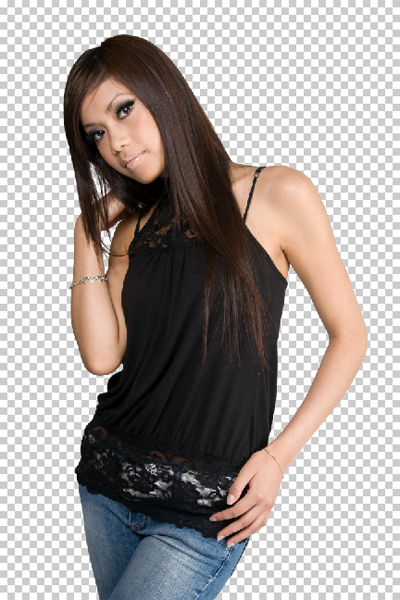
Now we have a mask in it’s own layer.

image


Adding a gradient to the background

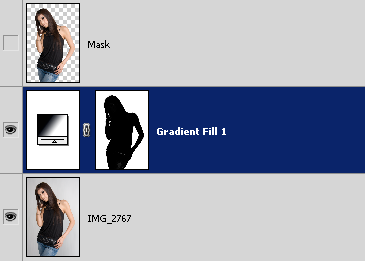
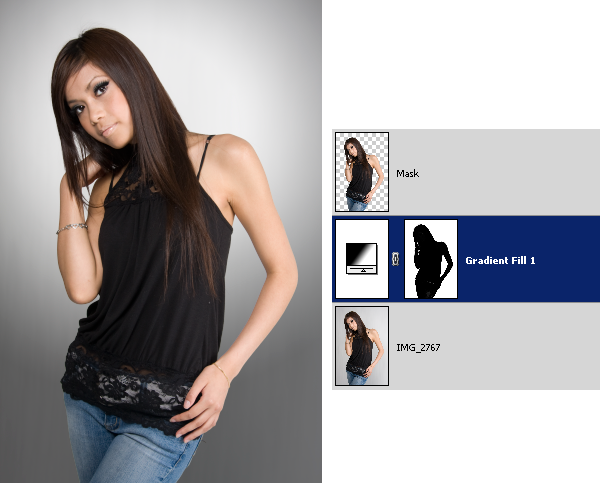
With the mask created, I can add a gradient to the background. Adding a gradient to the background is a simple and effective way to enhance a boring background. Here is a preview of what the layers will look like in the end.

image

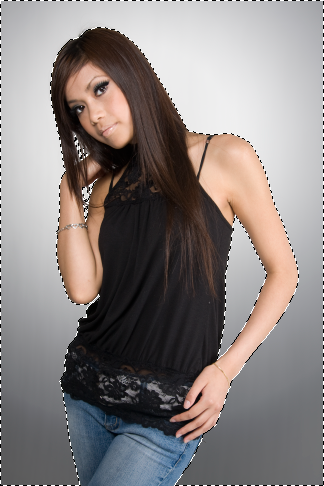
To create a gradient background, we’ll be adding a gradient fill layer using the mask that we just created. To do that, hold down the Ctrl key and click on the layer thumbnail of the layer “Mask”. It will load the selection of the layer. Choose Select > Inverse to inverse the selection. Then, choose Layer > New Fill Layer > Gradient.

image

In the Gradient Fill tool, move the center of the gradient behind the head. You can do this by clicking and dragging on the document window.

image

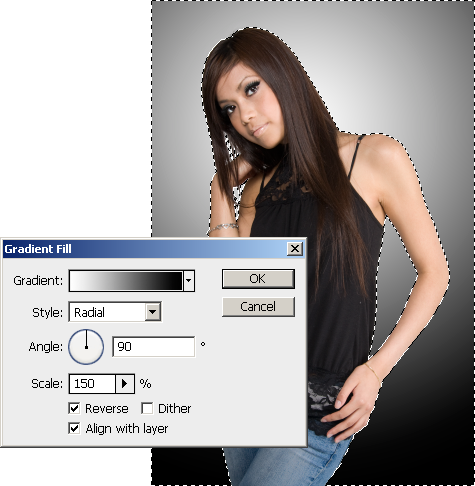
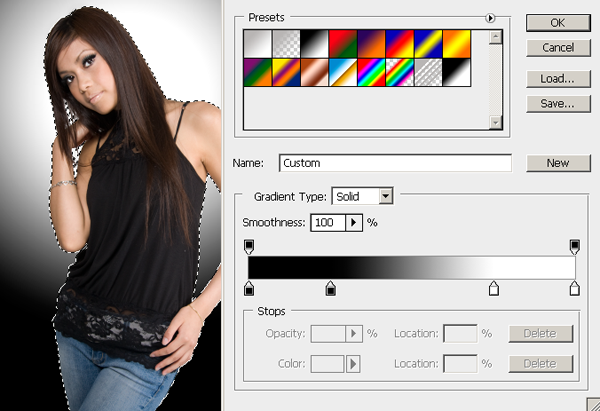
To increase contrast, you can change the gradient so that it is like the image below.

image

Finally, adjust the opacity of the Gradient Fill layer. I set mine to 50% opacity.

image


Tone

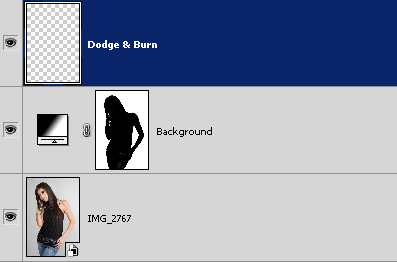
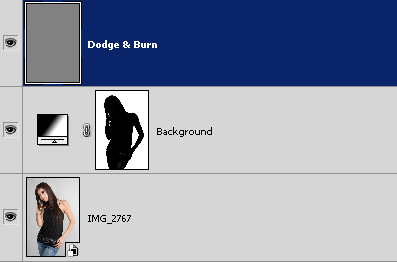
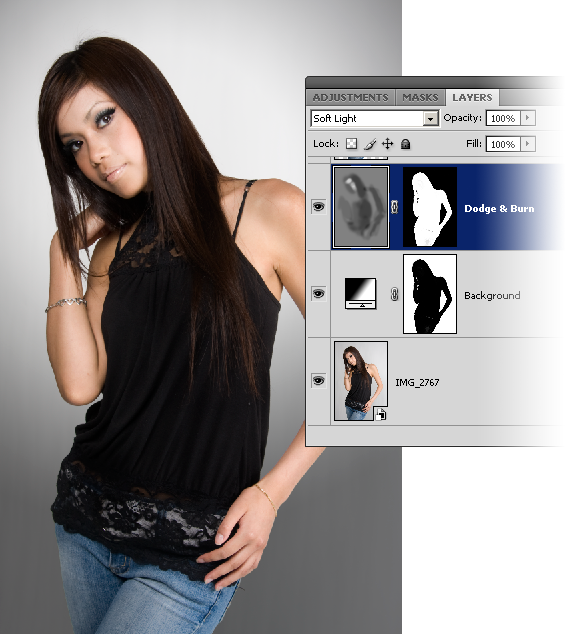
Begin by creating a new layer for dodging and burning. Position the layer above the gradient fill adjustment layer. Then, change the blending mode to soft light.

image

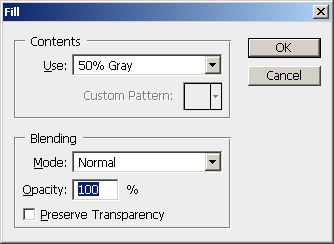
Choose Edit > Fill and use the settings below. image

The layer should now be filled with a 50% gray.

image

Add a layer mask using the shape from the Mask layer. Hold down the Ctrl key and click on the layer thumbnail of the Mask layer . Then, click on the image in the layers palette to add a layer mask.

image

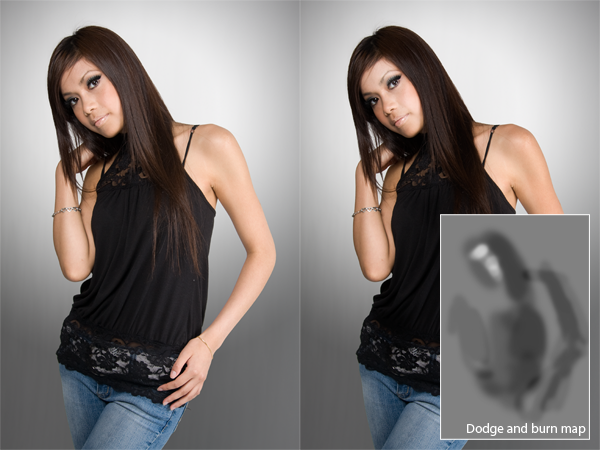
Click back on the 50% gray layer thumbnail and use the dodge and burn tools. For the image below, I used the burn tool to darken the models right side of the face, hair, top, and her arms. Then, I use the dodge tool to brighten the other side of the models face.

image

Here is a before and after effect of the dodging and burning.

image


Eye Brightening

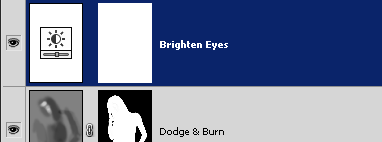
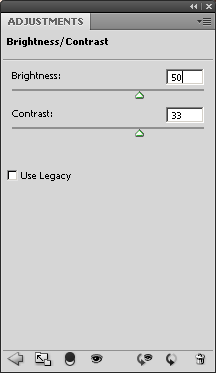
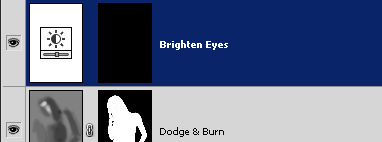
Brightening the eyes will have a dramatic effect. It can be easily done by using a Brightness/Contrast adjustment layer. Choose Layer > New Adjustment Layer > Brightness/Contrast to add a new Brightness/Contrast adjustment layer. Rename this layer to Brighten Eyes.

image

For now, set the brightness to 50 and contrast to 33.

image

Select the layer mask and choose Image > Adjustments > Invert. This will invert the layer mask from white to black.

image

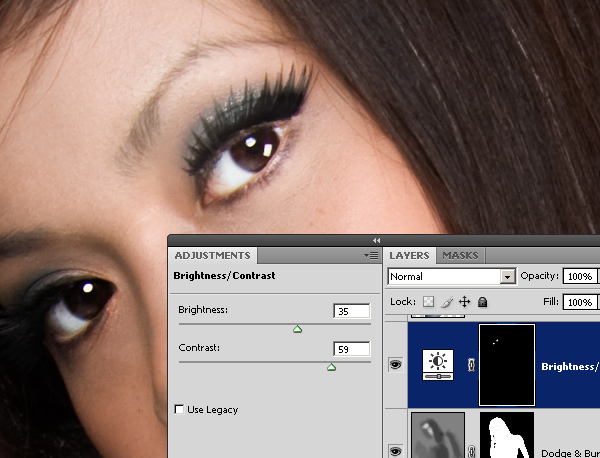
Using the brush tool, paint the layer mask where the eyes are. You should see the eyes brighten as you paint. Then, go back into the Brightness/Contrast settings and readjust the settings.

image


Hair Shine

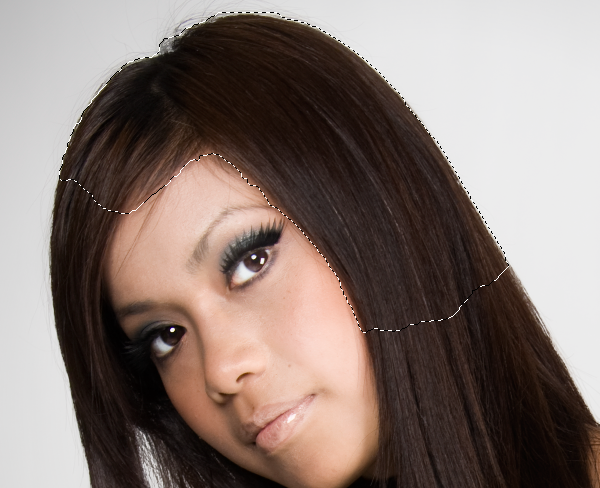
Finally, we’ll add a shine to the hair. Start by using the quick selection or magic wand tool to create a selection of the hair around the area where you want the shine to appear.

image

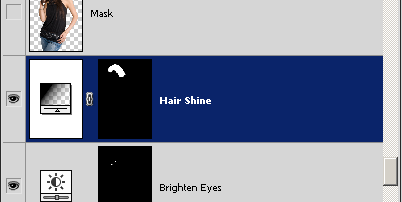
With the selection, choose Layer > New Fill Layer > Gradient. Position the layer above the Brighten Eye layer. Change the blending mode of the Hair Shine layer to overlay. You should have a layer like the image below.

image

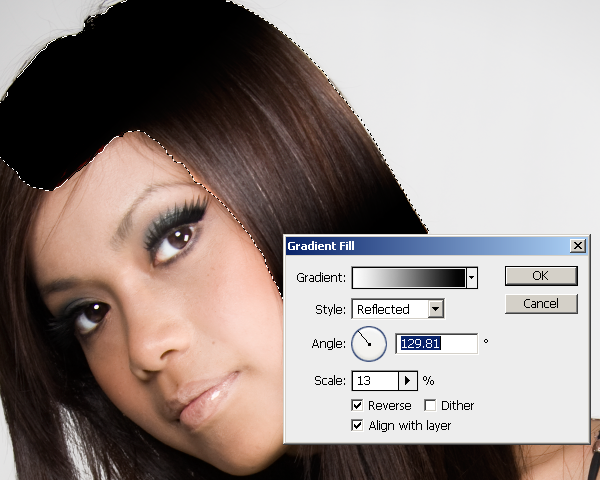
Go back into the Gradient Fill settings. Set the gradient to white to black and style to reflected. Checkmark the reverse option then click and drag on the document window and position the gradient where you want the hair shine to appear. Adjust the scale.

image

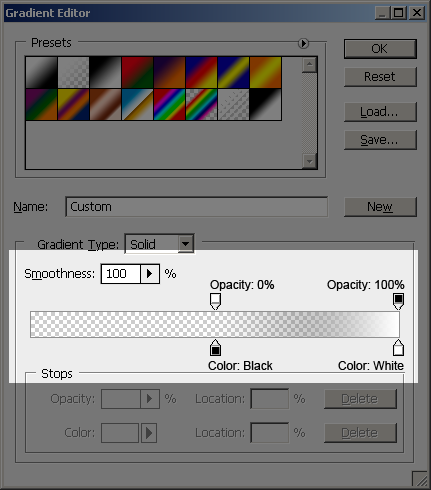
In the Gradient Fill window, click on the gradient to edit it. You should have a window like the image below. Create a gradient like the image below. To do this, click and drag the top left input slider to the middle of the gradient bar. Do the same with the bottom left input slider. Then, click on the individual input sliders and adjust the settings as shown in the image below.image

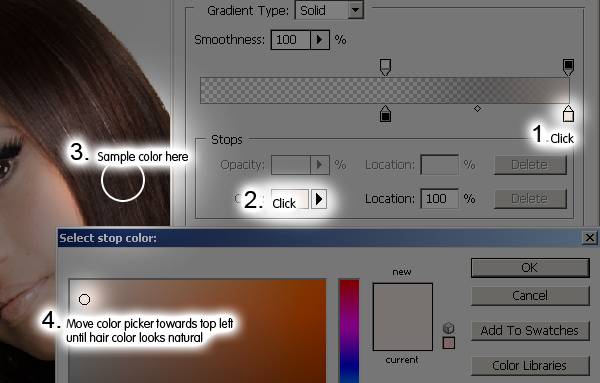
We now have a hair shine but it does not match the color of the hair. We’ll add back a little of the hair color to the shine.

  1. Click on the bottom left input slider.
  2. Click on the color setting and a color picker window will appear.
  3. Click on the hair to capture the color of the hair.
  4. Move the color picker towards the top left until the hair color looks natural.
  5. Click OK three times to exit out of the gradient settings.

image

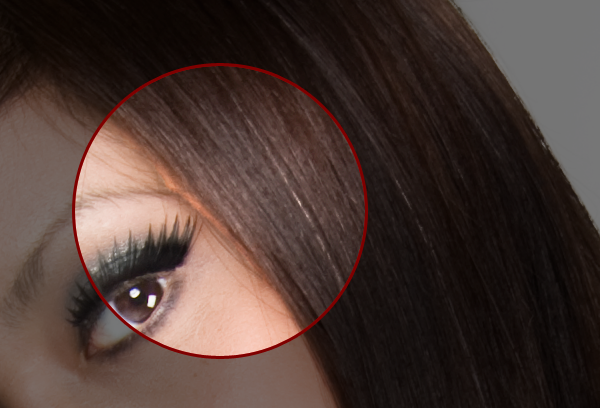
We have added the hair shine but if you look closely, you can see some artifacts.

image

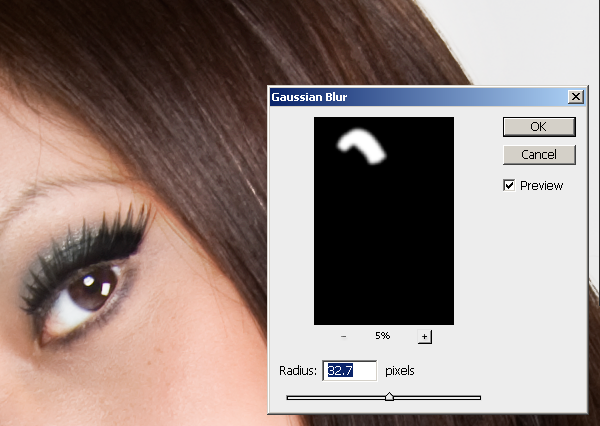
We can easily fix this by blurring the layer mask. Select the Hair Shine layer mask then choose Filter > Blur > Gaussian Blur. Adjust the settings until the unclean edge fades.

image

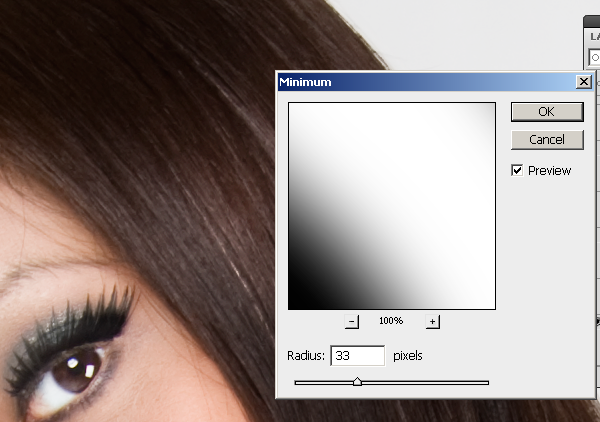
If the hair shine is overlapping the skin, use the Minimum filter to hide it. Choose Filter > Other > Minimum and adjust the slider.

image

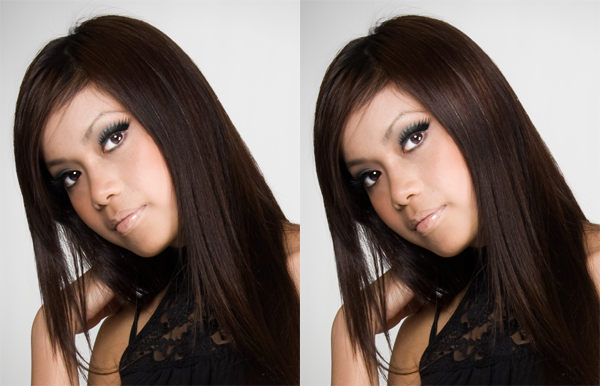
Here is the before and after effect of adding hair shine. You can add emphasis to the eyes by aligning the hair shine with the eyes.

image


Final Results

image

image