Showing posts with label photoshop. Show all posts

Before and After a photoshop tutorial

These tutorials are from Lam Tran Photography


Before / After
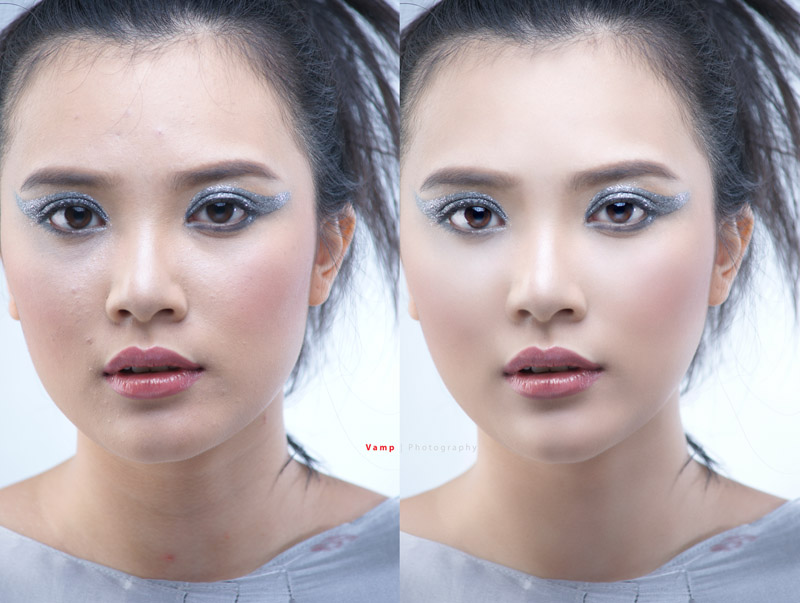
Ok, I usually don't upload Before / After photo like this because the model could be upset to see her original photo hahah joking but this time is an exception. I just want to show how a photo can be fixed in a digital way. You can notice that I haven't changed the color tone as well. And I haven't fixed her hairs on the forehead edge although I can do it easily drawing some hairs with my Wacom tablet. I'll show another Before / After photo next time.

Model is Kakao (her real name is Tú Thanh but she prefer to be called as Kakao), although she doesn't work in the industry as a professional model but she's one of my favorite model that I've worked for a few photoshoot.
MUA is Trân

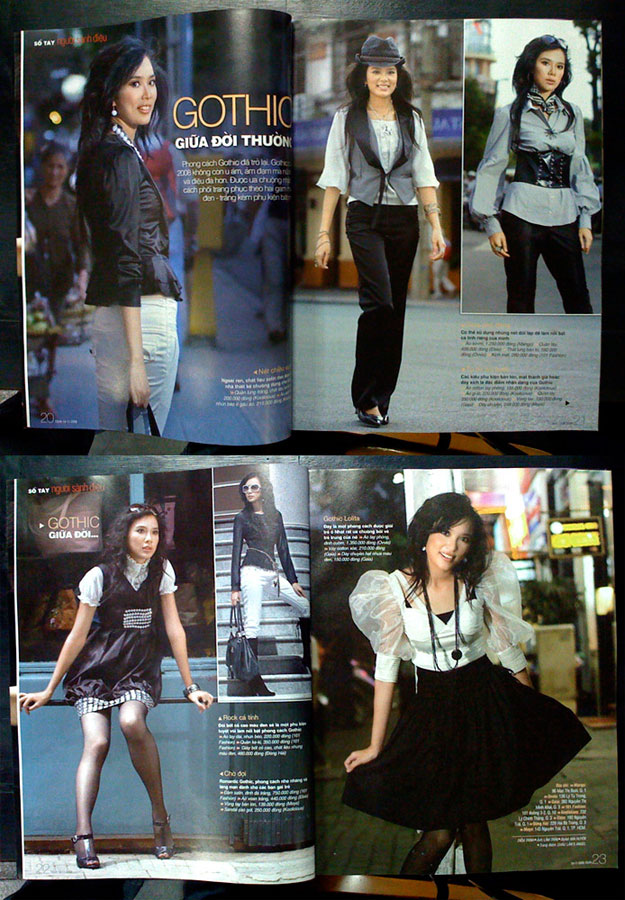
One of our published job, this was one of my very first magazine shoot, was done in Nov 2008


Before / After 2

Model: Ái Châu
MUA: Ghy
Hair: Tuấn

This is another Before / After image that I've said in this entry. The photo was from a beauty and hair shoot I've done in 2009. I wish I could do some tutorial vid for basic retouch like this but my laptop is really crap to capture screen motion. So I upload here 4 photos to explain some steps that I've done.


This is the original photo. As you can see the overal exposure is ok but I thought the photo looks a bit flat so I will adjust the Level to create some contrast.


In this photo, I used Level to adjust the contrast but you can notice that I still kept the hair's contrast as the same in the original. The hair somehow was the main key of this shot so I didn't want to loose the hair's details because of the contrast.
Then I used one of the most powerful tool (to me) to retouch her skin, that was: Patch Tool (shortcut: J) combined with the second most powerful tool: Clone Stamp Tool (S) to clean those shadow created between the cheek and nose.
Next step, I wanted her skin tone to look softer because it was so sharp (I shot at f10) then I used 3 filters to do this: Dust & Scratch, Gaussian Blur and Add Noise. I promise I will post another entry to explain more detail for this step although many of you have known about it already ad I've said, these are very basic retouch skill that you could find in any tutorial website.
After fixed her skin, then I wanted to make the photo look more eye catching by the contrast between shadow and highlight, I used 2 most popular tools: Burn Tool (O) and Dodge Tool (O)
Using Burn Tool apply into the shadow area to make they look stronger and deeper other while Dodge Tool could make the highlight area look brighter. (To do this, your photo first must have some distinguishable shadow and highlight)
The result looked like this:
You should remember that the result of this step depends on your style, your taste and your needs. There is no limit for making it look stronger or softer. Maybe some of you may say that I was overdo in this photo but this is something I like to create and to see. If you don't like it, just say, this is not your style.
You can also notice that I have played a little bit with the Liquify Filter to fix her nose and her hair, then a little bit contrast and saturation on her hair.
And when the photo was done as this step, I believed that it was good enough for print or web media but I'd like to try with B/W to see how could it look.

And here it is:

Well I kinda like this B/W version than the color version. But you should remember that when you convert a color photo into B/W photo usually it might be loose some color information then you can loose some contrast detail. You can fix that by adjust the level for shadow area then you can apply the Burn Tool to create more contrast.


Well, and that's it. Maybe some of you may think that the final photo look not too good. I didn't say it look good. But this is something I just want to show you about some basic retouching skill so it's not a big deal at all. Welcome all comment.


Before / After 3

Model: Margo Yalkovskaya
MUA: Linh Doan
Stylist: Chu Sen

From what I've said in the last entry (http://lamtrancit.blogspot.com/2010/02/before-after-2.html), I keep my words and make another short tutorial here with more information for the "3 steps": Dust and Scratch, Gaussian Blur and Add Noise.

This is the original image from a shoot for Margo Yalkovskaya and model Kaleriya.


The images size is quite large (it was created from my Sony A900 body). Why should you care about the image size? Because depend on how large the area skin you want to fix, you might use the filter more variable.

Duplicate your Background Layer to have Layer 1 (shortcut: Command J or Ctrl J on Windows)

Use Patch Tool or Healing Brush or Healing Brush Tool or Clone Stamp Tool to fix some major spots on her face.
You will have some results look like this


Next, duplicate to new layer, the new layer will be automatically named Layer 1 Copy
Then you begin to make new skin tone for her.

Use Dust And Scratch filter to have a window look like this:
You can choose a suitable number for the Radius. In the picture above, I choose 50 pixels because I have a skin area need to work with. You can adjust the Radius by dragging the arrow then check / uncheck to Preview box to see the result.
Hit OK to apply the filter.


Next, use the Gaussian Blur filter:

Again, find a suitable number for Radius. This step will help to soften area between shadow and highlight.
Hit Ok.


And next, Add Noise filter, you can skip this step if you like to have her face look smoother and softer. But I suggest you should do this step to add some little texture on her skin

If you're not sure how much noise you need to add, see the picture above as an example.
After that, apply Gaussian Blur filter one more time to soften those noise. See the picture below:


Remember that all these filter steps was applied on the same layer (that would be Layer 1 Copy)
Add a layer mask on the Layer 1 Copy and fill Black color on the photo when you select at the layer mask. So now you hide everything that was display earlier on the Layer 1 Copy. (You can also hold Alt when click to the button Add Layer Mask so that no need to fill the black color)

And now, use the Brush Tool, choose Soft Round Brush (brush's opacity at 10%) to paint white color into the area on her face that you want to get them soften. Avoid to paint on the areas that you want to keep the detail (i.e: eye, noise, lip, hair ...). If you think you overdo and the skin look so soft, you can change brush's color to Black and it will have the reverse effect.
So let's make it simple:
- Paint White will reveal the effect that you've done on Layer 1 Copy
- Paint Black will hide the effect away.
You can look at the picture below as a reference to see how much you need to keep the effect:

Finish the paint job, you will have the result like this:


Now you can duplicate Layer 1 to have Layer 1 Copy 2, then merge both Layer 1 Copy and Layer 1 Copy 2 to 1 layer. You can do this or skip it, really doesn't matter.
Now the photo will look like this:


Now apply some more additional steps to make the photos look better for example, use Clone Stamp Tool to fix the area on her forehead and her cheeks
You will have result like this:


Now you can do the step with Burn Tool and Dodge Tool as I've introduce in the last entry and adjust the Level or Curve to have the final result like this (totally up to you lol):

And yes, we have just finished! Congratulations! Yay!!!!

Phew, so many steps for me to create this tutorial. I could say that this is the first time I do some thing like this hahaha I hope you don't mind if I made any mistake above. This entry, actually is just a litte sharing from what I've known for photo retouching. It's not a perfect way to do the skin job. You can use some plugin to create a complete new skin tone which could look so fake (but you can fix by using the layer mask). So if you know something that can give a better result or something that you want to correct what I've said above, please feel free to share with me. Thank you.

Photoshop Soft Light Layer Tutorial

Make Up Effect for the Face

Make Up Effect for the Face

Make Up Effect for the Face

In this Photoshop tutorial I will be walking you through the creating new make up for the face.

Open up the stock photo you’ve chosen to be working with for this tutorial. First of all we need to make face skin softer. For this effect duplicate layer with Ctrl+D and apply Filter > Blur > Gaussian Blur with the next presets:

Make Up Effect Image 01

After that mess with the layer mode & opacity/fill. I tried Soft Light with opacity of 60%. Ok, now get out the Eraser Tool and make clear area out of face skin.

Make Up Effect Image 02

Merge two layers in one. See the difference:

Make Up Effect Image 03

After that I think we should add some lipstick on lips. So, select the Polygonal Lasso Tool and make selection as on picture below:

Make Up Effect Image 04

Press Ctrl+J to duplicate selected area and change the color with Image > Adjustments > Hue/Saturation using similar settings to these:

Make Up Effect Image 05

Now we have something like this:

Make Up Effect Image 06

To bring it real view find and get out the Eraser Tool and clear unnecessary parts of the layer out of lips. After that set opacity up to 70% for this layer.

Make Up Effect Image 07

Now I would like to change eyes color and add some eye shadows. Select the Elliptical Marquee Tool and make selection as below:

Make Up Effect Image 08

Press Ctrl+J to duplicate selected area on the new layer. Now Image > Adjustments > Levels with the next presets:

Make Up Effect Image 09

To get the next picture:

Make Up Effect Image 10

Ok, now select the Eraser Tool again and a soft round brush to make a little clean work as on picture below:

Make Up Effect Image 11

After that create a new layer, then select the Polygonal Lasso Tool and make selection similar to the picture below:

Make Up Effect Image 12

Fill the selection with color of #a2ab8d and press Ctrl+D to deselect chosen area:

Make Up Effect Image 13

Apply Filter > Blur > Gaussian Blur with the next presets:

Make Up Effect Image 14

Make Up Effect Image 15

Change layer mode to Hue:

Make Up Effect Image 16

Looking pretty good! Isn’t it? And the last one thing, I would like to put on rouge. For this create a new layer, then get out the Brush Tool and a soft round brush and make not so big spots from the left and rights sides of the face using color of #ff94a8:

Make Up Effect Image 17

Now apply Filter > Blur > Gaussian Blur with similar settings to these:

Make Up Effect Image 18

Your picture should look as mine:

Make Up Effect Image 19

Now clear rouge out of face borders using the Eraser Tool and set up layer mode to Color for the layer:

Make Up Effect Image 20

That is it! Now we have cool make up effect for the face.

Make Up Effect Image 21

Design a Stylish Fashion Advert

In this Photoshop tutorial we’ll be designing a simple but stylish fashion-themed advert. You know, so you can sell sunglasses and stuff ;)

Stylish Fashion Advert Photoshop Tutorial

1. Document Creation

Get started by finding a nice, suitable stock photo to work with. For this you’ll want to use one of the following websites:

I used a stock photo that I bought/downloaded for free (can’t remember exactly) from iStockPhoto a while ago.

Stock Photo Chosen

As you can see, I’ve chosen a photo of a pretty girl wearing big sunglasses (now the theme of the design). Open your photo in Photoshop and get to work by resizing it, copying it to a new document, or whatever you want to do with it.

2. Colourise

Create a new layer (layer > new > layer) then get out the Gradient Tool. Using the gradient tool, add a very bright radial gradient onto your new layer (like this):

Bright Radial Gradient Added

Try a few different layer modes and see which one looks best to you (I chose Screen):

Layer Mode Changed to Screen

You might also want to try a few different Solid Color fill layers, then mess with the settings for those, but this will be fine for now.

Please note that the colors that I used in the radial gradient were roughly #f743fb and #6909d1.

3. Shapes / Details

For this part of the tutorial you might want to hide the layer we previously made (the gradient layer). Start by getting out the Custom Shape Tool and finding the heart shape (or any other shape you think would look cool). Create a new layer and make a few white hearts on your canvas.

White Heart Shapes Added

As you can see in the above image, I also rotated a few of my heart shapes to make it look a little more interesting! Finish off with the hearts by adding a larger, pink-filled one in the background (behind your white shapes).

Larger Shape Added

I finished up by lowering the opacity for the larger heart shape layer, and erasing a few of the edges from the smaller heart shapes (see in the below image):

Heart Shapes Adjusted

Take note that this isn’t an exact science! Get creative here.

4. Halftone Effect

Now we want to add something really interesting on top of our hearts/shapes. Start by opening the Channels tab (window > channels) and creating a new channel (create a new channel by clicking the icon at the bottom of the palette). You might need/want to make a new layer before doing this channel business.

Add New Channel in Channels Palette

After you’ve made yourself a new channel, get out the brush tool, and using a large, soft brush, dob a few times onto your black canvas (making sure your new channel is selected).

Add Brushing to Custom Channel

Now to make an interesting effect out of these boring dobs — go to Filter > Pixelate > Color Halftone and use an appropriate setting (you’ll have to press OK and check if it’s good enough). Using 32 as your Max. Radius should be good enough.

Pixelate Color Halftone Filter Added

Now, holding ctrl down on your keyboard, click on the thumbnail for your new channel, this will select the pixels. Go back to your layers palette and select a new/blank layer. Fill your newly-made selection in the fresh layer with the very bright & colorful gradient that comes with Photoshop.

Colorful Gradient Added to Halftone Selection

To finish off with the halftone effect, you might want to erase the shape away a little bit, in case it’s hiding a bit of the face. Or you could go back to the channel and redo it so it’s a little more to your liking. Unhide your previously-hidden gradient layer and see how it’s looking now!

Unhide Screen Gradient Layer

5. Image Adjustments

It would probably have made more sense to do the image adjustments at the start of the tutorial, but now we know what our outcome is mostly going to look like, we can make some photo adjustments to our stock. The main thing I did was add a levels adjustment layer below our screen gradient layer (note: layer > new adjustment layer > levels).

Levels Adjustment Layer

You may also want to adjust the photo in a few other ways, for example, you could make her lips sparkle a little more? I don’t know! ;)

5. Add Text

This design wouldn’t be complete without some sort of text now, would it? Start by getting out the Horizontal Type Tool (just the regular text tool!) and write out some text, in this case I used two sets of text, one reading YOUR 2ND PAIR and the second set of text reading 50% OFF.

Decker Font Used for Text

The beautiful font which I’ve used above is called Decker, and you can download it completely for free at Urban Fonts. For all of the text I used Decker Regular, except for the word OFF, which I used Decker Bold on. After you’re all done with the text settings, position it accordingly.

Text Positioned Lower Right

I’m not actually sure where would be the best place for this text. If you find your text doesn’t fit, you could always make it smaller and add a Drop Shadow to make it stand out a little more.

Additional Effects

Basically now you should get creative and throw whatever you’ve got onto the canvas, such as patterns, maybe textures, other stock photos, something to go with the theme you’re working with. One thing that I thought was a good idea was to add a scan line pattern into the corner and make it blend in nicely using the layer modes.

Just remember though, you can download the complete PSD file from this tutorial, so if there was something you need help with or want to check out, please feel free to download the PSD file. Another thing to do after you’re all done is change the colors used in your Screen gradient layer, you might come up with a surprisingly nice result!

Stylish Fashion Advert Photoshop Tutorial

Mission Accomplished

Well, we’re done for the tutorial! I hope you enjoyed it, even just a little bit. Now you’re equipped with the knowledge of designing a nice, fashion-themed advert, and the possibility of selling sunglasses will haunt you for the rest of your days :)