A sweet lesson on patience

A NYC Taxi driver wrote:

I arrived at the address and honked the horn. After waiting a few minutes I honked again. Since this was going to be my last ride of my shift I thought about just driving away, but instead I put the car in park and walked up to the door and knocked.. 'Just a minute', answered a frail, elderly voice. I could hear something being dragged across the floor.

After a long pause, the door opened. A small woman in her 90's stood before me. She was wearing a print dress and a pillbox hat with a veil pinned on it, like somebody out of a 1940's movie.

By her side was a small nylon suitcase. The apartment looked as if no one had lived in it for years. All the furniture was covered with sheets.

There were no clocks on the walls, no knickknacks or utensils on the counters. In the corner was a cardboard
box filled with photos and glassware.

'Would you carry my bag out to the car?' she said. I took the suitcase to the cab, then returned to assist the woman.

She took my arm and we walked slowly toward the curb.

She kept thanking me for my kindness. 'It's nothing', I told her.. 'I just try to treat my passengers the way I would want my mother to be treated.'

'Oh, you're such a good boy, she said. When we got in the cab, she gave me an address and then asked, 'Could you drive
through downtown?'

'It's not the shortest way,' I answered quickly..

'Oh, I don't mind,' she said. 'I'm in no hurry. I'm on my way to a hospice.

I looked in the rear-view mirror. Her eyes were glistening. 'I don't have any family left,' she continued in a soft voice..'The doctor says I don't have very long.' I quietly reached over and shut off the meter.

'What route would you like me to take?' I asked.

For the next two hours, we drove through the city. She showed me the building where she had once worked as an elevator operator.

We drove through the neighborhood where she and her husband had lived when they were newlyweds She had me pull up in front of a furniture warehouse that had once been a ballroom where she had gone dancing as a girl.

Sometimes she'd ask me to slow in front of a particular building or corner and would sit staring into the darkness, saying nothing.

As the first hint of sun was creasing the horizon, she suddenly said, 'I'm tired.Let's go now'.
We drove in silence to the address she had given me. It was a low building, like a small convalescent home, with a driveway that passed under a portico.

Two orderlies came out to the cab as soon as we pulled up. They were solicitous and intent, watching her every move.
They must have been expecting her.

I opened the trunk and took the small suitcase to the door. The woman was already seated in a wheelchair.

'How much do I owe you?' She asked, reaching into her purse.

'Nothing,' I said

'You have to make a living,' she answered.

'There are other passengers,' I responded.

Almost without thinking, I bent and gave her a hug.She held onto me tightly.

'You gave an old woman a little moment of joy,' she said. 'Thank you.'

I squeezed her hand, and then walked into the dim morning light.. Behind me, a door shut.It was the sound of the closing of a life..

I didn't pick up any more passengers that shift. I drove aimlessly lost in thought. For the rest of that day,I could hardly talk.What if that woman had gotten an angry driver,or one who was impatient to end his shift? What if I had refused to take the run, or had honked once, then driven away?

On a quick review, I don't think that I have done anything more important in my life.

We're conditioned to think that our lives revolve around great moments.

But great moments often catch us unaware-beautifully wrapped in what others may consider a small one.


Just beautiful!

Happy Valentine!!!

Happy Valentine!!! to my sweet love Lucy Le


valentine

Les Ames Soeurs

This was an independent project put together showing wedding fashion looks in downtown Detroit, with a photo shoot in motion feel.
By RockStar Media plus

Shot on a Canon 5D and 7D

Les Ames Soeurs from RockStar Media on Vimeo.

Worlds Fastest Compact Flash Storage

Check this out $1499 for a Worlds Fastest Compact Flash Storage


Memory cards have come a long way in the past decade. My first cards were 256 MB and ran at 4X speed and cost $250 per card. Yes, that is correct! Not Gigabyte but Megabyte. And the speed was 4X not 400X. And the cost? Well we just knew that we were on the cusp of a learning curve, so we bit the bullet and ordered enough to cover our first event.

Back in 2001, our first digital cameras had 3.1MP sensors, so the file size was tiny at best. And since we were used to shooting film, exposure was not an issue, so we shot in jpeg. Computer hard drives averaged 20-40GB, so we always backed up the image files onto CD-ROMs that cost $1.50 – $3 each instead of leaving the files on the computer. Ah the early days of digital…

Fast-forward to today where everyone has 30GB of flash storage, RAW format is the norm, and our computers have enough storage to handle anything. If you still need more storage or want to move the file outside your location, cloud hosting may be the answer.

Video has also moved into the digital realm with most SLR cameras offering assorted video recording functions. Video put huge demands on memory and must move huge amounts of data into a storage area quickly. Compact flash cards have been the leaders in storage capacity and transfer speed for most professional grade cameras, and are now changing once again.

SanDisk brings the latest advancements to the forefront offering 128GB cards with the speed to match at 100MB per second. This will allow a capture of full HD video storage with today’s pro DSLR cameras. Advance features such as these do come at a price. SanDisk will be retailing the newest cards for $1499 so get your credit card ready.

Read the full press release at SanDisk

Kodachrome Is Dead

A Fitting End To An Era: Kodachrome Is Dead

When Kodak stopped producing the film last year they gave Steve McCurry the last roll. He hand delivered that roll to Dwayne’s Photo in Parsons, Kansas the last lab on the planet to process Kodachrome. On December 30 they discontinued the processing forever. Here’s a frame from that last roll and more can be found on McCurry’s blog:


There’s a fitting tribute to the Kodachrome Generation over on David Burnett’s blog (here).

Truth be told, the last ten or 15 years were not easy for anyone what actually WANTED to shoot KR. Kodak slowly closed labs around the world, and the mere act of getting your film souped became Herculean. (Actually, Hercules shot tri-x.) So when the marketing people at Kodak (this actually happened ten years ago at a dinner in DC) would say that “there is no demand for the film anymore… no one wants to use it..” I had to remind him that at some point anyone using the film — or any film — actually wants to be able to SEE WHAT THE HELL THEY SHOT! You can’t expect people to wait a week to see their work. The technology existed to create small mini Kodachrome processing machines which could reasonably be installed at any good sized one-hour lab in the country. But for reasons known only to the geniuses at Kodak’s planning department, no serious consideration was ever given to supporting that project. They sure could have sold a lot of film if only we’d been able to see it in a timely manner. Perhaps it’s a parable for what technology is doing to our society.

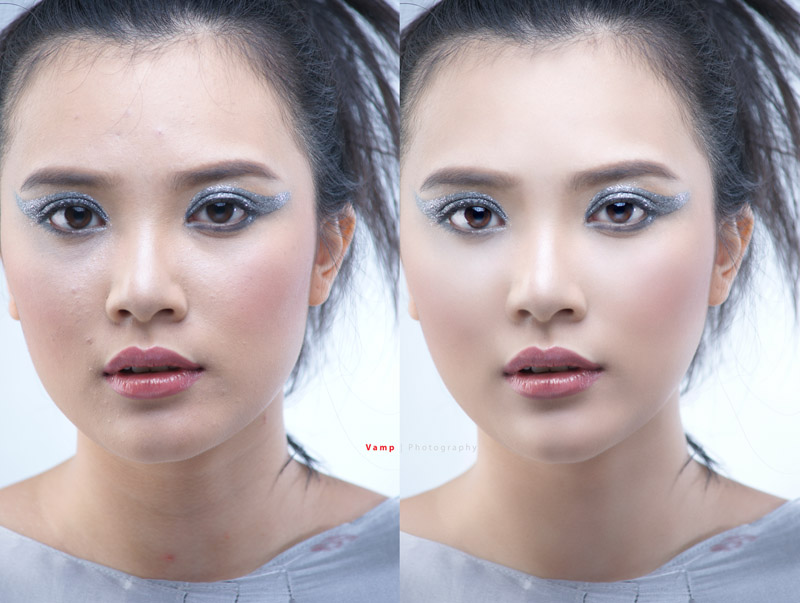
Before and After a photoshop tutorial

These tutorials are from Lam Tran Photography


Before / After

Ok, I usually don't upload Before / After photo like this because the model could be upset to see her original photo hahah joking but this time is an exception. I just want to show how a photo can be fixed in a digital way. You can notice that I haven't changed the color tone as well. And I haven't fixed her hairs on the forehead edge although I can do it easily drawing some hairs with my Wacom tablet. I'll show another Before / After photo next time.

Model is Kakao (her real name is Tú Thanh but she prefer to be called as Kakao), although she doesn't work in the industry as a professional model but she's one of my favorite model that I've worked for a few photoshoot.
MUA is Trân

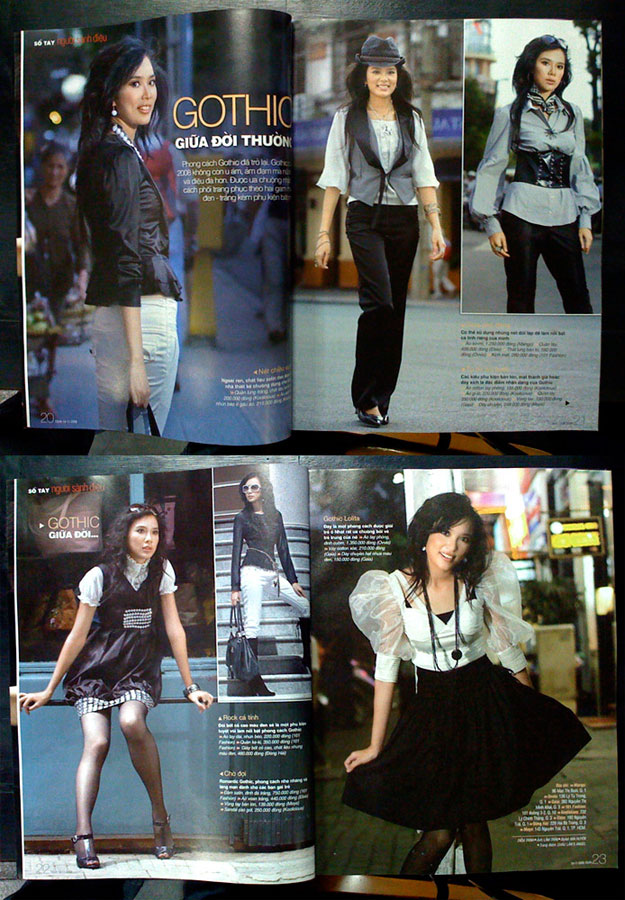
One of our published job, this was one of my very first magazine shoot, was done in Nov 2008


Before / After 2

Model: Ái Châu
MUA: Ghy
Hair: Tuấn

This is another Before / After image that I've said in this entry. The photo was from a beauty and hair shoot I've done in 2009. I wish I could do some tutorial vid for basic retouch like this but my laptop is really crap to capture screen motion. So I upload here 4 photos to explain some steps that I've done.


This is the original photo. As you can see the overal exposure is ok but I thought the photo looks a bit flat so I will adjust the Level to create some contrast.


In this photo, I used Level to adjust the contrast but you can notice that I still kept the hair's contrast as the same in the original. The hair somehow was the main key of this shot so I didn't want to loose the hair's details because of the contrast.
Then I used one of the most powerful tool (to me) to retouch her skin, that was: Patch Tool (shortcut: J) combined with the second most powerful tool: Clone Stamp Tool (S) to clean those shadow created between the cheek and nose.
Next step, I wanted her skin tone to look softer because it was so sharp (I shot at f10) then I used 3 filters to do this: Dust & Scratch, Gaussian Blur and Add Noise. I promise I will post another entry to explain more detail for this step although many of you have known about it already ad I've said, these are very basic retouch skill that you could find in any tutorial website.
After fixed her skin, then I wanted to make the photo look more eye catching by the contrast between shadow and highlight, I used 2 most popular tools: Burn Tool (O) and Dodge Tool (O)
Using Burn Tool apply into the shadow area to make they look stronger and deeper other while Dodge Tool could make the highlight area look brighter. (To do this, your photo first must have some distinguishable shadow and highlight)
The result looked like this:
You should remember that the result of this step depends on your style, your taste and your needs. There is no limit for making it look stronger or softer. Maybe some of you may say that I was overdo in this photo but this is something I like to create and to see. If you don't like it, just say, this is not your style.
You can also notice that I have played a little bit with the Liquify Filter to fix her nose and her hair, then a little bit contrast and saturation on her hair.
And when the photo was done as this step, I believed that it was good enough for print or web media but I'd like to try with B/W to see how could it look.

And here it is:

Well I kinda like this B/W version than the color version. But you should remember that when you convert a color photo into B/W photo usually it might be loose some color information then you can loose some contrast detail. You can fix that by adjust the level for shadow area then you can apply the Burn Tool to create more contrast.


Well, and that's it. Maybe some of you may think that the final photo look not too good. I didn't say it look good. But this is something I just want to show you about some basic retouching skill so it's not a big deal at all. Welcome all comment.


Before / After 3

Model: Margo Yalkovskaya
MUA: Linh Doan
Stylist: Chu Sen

From what I've said in the last entry (http://lamtrancit.blogspot.com/2010/02/before-after-2.html), I keep my words and make another short tutorial here with more information for the "3 steps": Dust and Scratch, Gaussian Blur and Add Noise.

This is the original image from a shoot for Margo Yalkovskaya and model Kaleriya.


The images size is quite large (it was created from my Sony A900 body). Why should you care about the image size? Because depend on how large the area skin you want to fix, you might use the filter more variable.

Duplicate your Background Layer to have Layer 1 (shortcut: Command J or Ctrl J on Windows)

Use Patch Tool or Healing Brush or Healing Brush Tool or Clone Stamp Tool to fix some major spots on her face.
You will have some results look like this


Next, duplicate to new layer, the new layer will be automatically named Layer 1 Copy
Then you begin to make new skin tone for her.

Use Dust And Scratch filter to have a window look like this:
You can choose a suitable number for the Radius. In the picture above, I choose 50 pixels because I have a skin area need to work with. You can adjust the Radius by dragging the arrow then check / uncheck to Preview box to see the result.
Hit OK to apply the filter.


Next, use the Gaussian Blur filter:

Again, find a suitable number for Radius. This step will help to soften area between shadow and highlight.
Hit Ok.


And next, Add Noise filter, you can skip this step if you like to have her face look smoother and softer. But I suggest you should do this step to add some little texture on her skin

If you're not sure how much noise you need to add, see the picture above as an example.
After that, apply Gaussian Blur filter one more time to soften those noise. See the picture below:


Remember that all these filter steps was applied on the same layer (that would be Layer 1 Copy)
Add a layer mask on the Layer 1 Copy and fill Black color on the photo when you select at the layer mask. So now you hide everything that was display earlier on the Layer 1 Copy. (You can also hold Alt when click to the button Add Layer Mask so that no need to fill the black color)

And now, use the Brush Tool, choose Soft Round Brush (brush's opacity at 10%) to paint white color into the area on her face that you want to get them soften. Avoid to paint on the areas that you want to keep the detail (i.e: eye, noise, lip, hair ...). If you think you overdo and the skin look so soft, you can change brush's color to Black and it will have the reverse effect.
So let's make it simple:
- Paint White will reveal the effect that you've done on Layer 1 Copy
- Paint Black will hide the effect away.
You can look at the picture below as a reference to see how much you need to keep the effect:

Finish the paint job, you will have the result like this:


Now you can duplicate Layer 1 to have Layer 1 Copy 2, then merge both Layer 1 Copy and Layer 1 Copy 2 to 1 layer. You can do this or skip it, really doesn't matter.
Now the photo will look like this:


Now apply some more additional steps to make the photos look better for example, use Clone Stamp Tool to fix the area on her forehead and her cheeks
You will have result like this:


Now you can do the step with Burn Tool and Dodge Tool as I've introduce in the last entry and adjust the Level or Curve to have the final result like this (totally up to you lol):

And yes, we have just finished! Congratulations! Yay!!!!

Phew, so many steps for me to create this tutorial. I could say that this is the first time I do some thing like this hahaha I hope you don't mind if I made any mistake above. This entry, actually is just a litte sharing from what I've known for photo retouching. It's not a perfect way to do the skin job. You can use some plugin to create a complete new skin tone which could look so fake (but you can fix by using the layer mask). So if you know something that can give a better result or something that you want to correct what I've said above, please feel free to share with me. Thank you.

Andrew's graduation

Andrew's graduation

Strobist practice one speedlite and home make small soft box. Chân dung ban đêm với một flash tàu và softbox tự chế.


Manual fill flash and bokeh, this photo taking in manual mode speed 1/200 I immediately go all the way to my Canon XSi sync speed and set aperture to F/3.2 . Then adjust power on my flash to get the photo to my taste . Chân dung ngoài trời chụp bằng chế độ manual ISO 100, Focal 50mm, F/3.2, 1/200 sec (Canon Rebel XSi sync speed)

This photo without flash but speed at 1/400 sec

Andrew and Bin at Sea World

Andrew's graduation June 24th, 2010


The Pyramid

The pyramid,Las Vegas taking with Canon Rebel XSi and Tamron 28-75mm

Exif: ISO 200, 1/250Sec, F/9, focal 28mm

My first boudoir phototography

My first bourdoir taking with Canon Rebel XSi and Canon EF 50mm prime lens, ETTL flash bounce up from the ceiling.


Model: Lucy Le
Makeup: Lucy Le
Photographer: Chinh Minh Le @ Allpixels studio


Bé Bơ

Bé Bơ 3 tháng tuổi chụp bằng Canon Rebel XSi và ống kính 50mm F/1.8 (Nifty fifty)

This is my son Be Bo , he is 3 months old my model for strobist practice. Canon Rebel XSi with nifty fifty and off brand flash ( can't afford Canon EX yet ) shoot thru umbrella with the following power setting:


This one with 1/16 power


This one with 1/8 power


This one with 1/4 power

Lê Bình Minh

I love the nifty fifty lens want sharp photos you got it, want DOF not a problem.


Tamron AF28-75mm F/2.8

Here are two photo I took with my Canon Rebel XSi and Tamron AF28-75mm lens. Just right click and save them to your PC, you can use them as wall papers.


Colors Of Life


Bears cutie

Las Vegas trip

Two weeks ago we took a two days trip to Las Vegas, we spend most of the time go from hotel to hotel just to see the beautiful design and decoration. Las Vegas has some of the most beautiful hotel casino in the world. The last day we stopped at the beautiful Wynn and Encore hotel and casino. I took a lot of pictures on the two days trip brought with me was my Canon Rebel XSi and two lens the Canon 17-40mm F/4 L and Tamron 28-75mm. As promise I post some of the photos taking with my Canon XSi and Canon 17-40mm F/4 L. Enjoy thanks for stopping by.


These two photos are at the Encore hotel casino what a gorgeous bar, may be next time I will get me a drink here must be expensive...


.